This page describes mounting the robot on an alternative surface (non-pedestal)
Important
- Avoid lifting the Sawyer Robot by the head.
- The Sawyer Robot weights 19kg (42lbs).
Please use proper precautions when moving Sawyer.
The Sawyer robot can be mounted directly to a surface or using a separately purchased mounting plate. Both options are described below.
Direct to Surface Mounting Instructions
Preparation
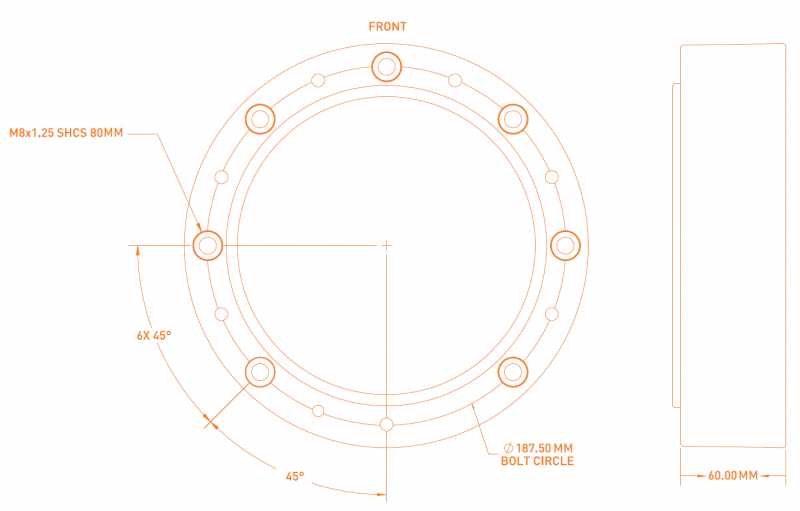
Important: Ensure the cables on the back of the robot have 60mm of clearance below the mounting surface (ie: mount the robot at the edge of a table). If the mounting surface does not have sufficient clearance, the mounting plate option described below may be required.
Required Hardware
- Level
- Drill
- Drill Bit for 8mm Screw
- 6mm Hex Key
- (7) M8x12 SHCS (included)
Mounting Dimensions

Instructions
- Use a flat, level, sturdy surface, anchored to the floor, with a thickness of 15-50mm (0.75 - 2 in).
- Consider power outlet and pneumatic line locations, controller location, cable length, and workspace requirements when choosing a mounting location for the robot.
- Position the arm where you would like it to be mounted.
- Clearly mark each mounting location using a pen and the mounting holes on the robot as a guide. There will be a total of 7 locations.
- Set the arm aside.
- Drill and tap the holes to accommodate the M8x1.25 screws provided.
- Align the arm with the new holes and secure the robot arm using the screws provided.
Mounting Plate Instructions
Required Hardware
- Level
- Drill
- Drill Bit for 8mm Screw
- 6mm Hex Key
- (7) M8x12 SHCS (included)
Mounting Dimensions
Instructions
- Use a flat, level, sturdy surface, anchored to the floor, with a thickness of 15-50mm (0.75 - 2 in).
- Consider power outlet and pneumatic line locations, controller location, cable length, and workspace requirements when choosing a mounting location for the robot.
- Position the mounting plate where you would like the robot to be mounted.
- Clearly mark each mounting location using a pen and the mounting holes as a guide. There will be a total of 7 locations.
- Set the mounting aside.
- Drill and tap the holes to accommodate the M8x1.25 screws.
- Align the mounting plate with the new holes and secure the plate using the M8x12 screws provided.
- Align the arm with the tapped holes on the mounting plate and use the screws provided with the robot.