Contents
- 1 Description
- 2 Important
- 3 Required Hardware
- 4 Installation File
- 5 Mounting Dimensions
- 6 Step 1: Create Mounting Location
- 7 Step 2: Remove Packaging
- 8 Step 3: Attach Carabiners
- 9 Step 4: Secure to Lift
- 10 Step 5: Detach Baxter from Crate
- 11 Step 6: Lift and Place Baxter
- 12 Step 7: Secure Baxter to Pedestal
- 13 Step 8: Release Baxter
- 14 Step 9: Level Baxter
- 15 Linked Here
- 16 Related Pages
Description
This page describes mounting Baxter on an alternative surface (non-pedestal).
Important
Baxter weighs 165 lbs (75 kg)
Please use proper precautions when moving Baxter.
A Hoist lift rated for at least 250 lbs. is suggested for such lifting.
Required Hardware
- Drill
- Drill bit to fit M10 Screw
- Tape measure
- Level
- 4 Hex Head Cap Screws (enclosed)
- 2 Carabiner Hooks (enclosed)
- 17mm Wrench
- 1/2˝ Wrench
- Tape Measure
- Flat Head Screwdriver
- Hoist/lift rated for at least 250 lbs.
Installation File
Mounting Dimensions
For alternative surface mounting (non-pedestal)
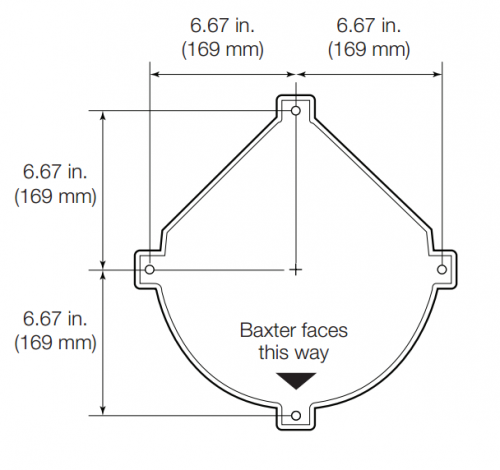
Step 1: Create Mounting Location
The suggested alternate mounting surface is a solid bench with a flat, level surface, and four sturdy legs, anchoring the bench securely to the floor.
Select mounting position on bench carefully so that robot does not tip.
Using above mounting dimensions as referece, drill 4 holes to fit
enclosed Hex Head Cap Screws.
If longer screws are needed, use M10 screws.
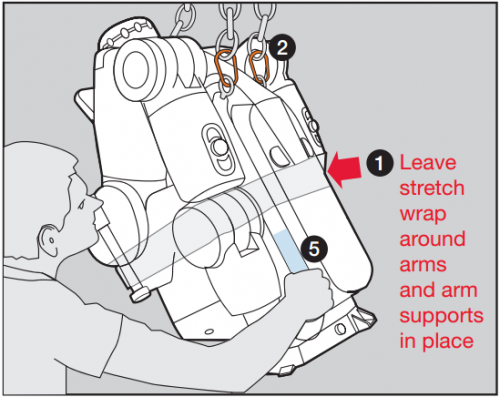
Step 2: Remove Packaging
Remove outer plastic bag, and foam around head and shoulders.
Leave stretch wrap around arms and arm supports in place until robot is mounted securely.
Step 3: Attach Carabiners
Attach the 2 enclosed carabiners hooks to shoulder bolts on the robot, marked with blue tabs.
Remove blue tabs after use.
Step 4: Secure to Lift
Attach chain hooks from lift to carabiners and secure other ends to lift.
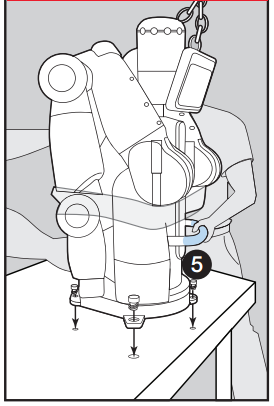
Step 5: Detach Baxter from Crate
Using 1/2” wrench, remove 4 bolts and washers from crate at robot base.
Throw away bolts with packaging.
Step 6: Lift and Place Baxter
Using black metal handles to guide robot, lift robot to mounting surface.
Align robot base to bolt holes.
Note: It is normal for the robot to tilt forward while hanging on a lift.
Step 7: Secure Baxter to Pedestal
Insert 4 enclosed Hex Head Cap Screws into 4 holes at base of robot.
Tighten screws finger tight until flush.
Using 17mm wrench, TIGHTEN A HALF TURN MORE.
Step 8: Release Baxter
Once robot is secured, release chain hooks from carabiners. Remove carabiners from shoulder bolts, and save in “Start Here” box.
Remove stretch wrap and arm supports.
Step 9: Level Baxter
It is important for Baxter to work in a level environment.
Make any necessary adjustments to ensure Baxter is stable. Please use the built-in round level (near electrical/network connectors) for verification.
Linked Here
- Baxter Hardware Setup - Baxter Hardware Setup Tutorial
Related Pages
- Baxter Pedestal Mounting - Instructions for mounting Baxter on the standard mounting pedestal.