Contents
Gripper Control
Summary
Use gripper control as an example of controlling Baxter's grippers.
Code Walkthrough
Gripper Keyboard - Code Walkthrough
Overview
Uses the keyboard or joystick to control Baxters grippers. Position, velocity, holding, and moving force can be controlled and sensed. Both logitech and xbox game controllers are supported.
Usage
Start gripper control from an RSDK terminal session using:
$ rosrun baxter_examples gripper_keyboard.py
IMPORTANT: You will have to calibrate both grippers before using any of the other commands using C/c commands:
Once calibrated, future calibrate commands will not do anything unless you send a 'reset' first.
Key Bindings
Get a list of commands by entering '?'
| Key | Left | Key | Right |
|---|---|---|---|
| ? | Help | Esc | Quit |
| c | left: calibrate | C | right: calibrate |
| q | left: close | Q | right: close |
| w | left: open | W | right: open |
| u | left: decrease position | U | right: decrease position |
| i | left: increase position | I | right: increase position |
| v | left: decrease velocity | V | right: decrease velocity |
| b | left: increase velocity | B | right: increase velocity |
| h | left: decrease holding force | H | right: decrease holding force |
| j | left: increase holding force | J | right: increase holding force |
| f | left: decrease moving force | F | right: decrease moving force |
| g | left: increase moving force | G | right: increase moving force |
| z | left: decrease dead band | Z | right: decrease dead band |
| x | left: increase dead band | X | right: increase dead band |
| [ | left: set 100% velocity | { | right: set 100% velocity |
| ] | left: set 30% velocity | } | right: set 30% velocity |
| r | left: reset | R | right: reset |
| s | left: stop | S | right: stop |
You can monitor the changes you are making using the following rostopics which you can monitor from a different shell:
rostopic echo /robot/end_effector/left_gripper/command
rostopic echo /robot/end_effector/right_gripper/command
Joystick Control
To use the example gripper program using a joystick game controller to control the grippers:
First ensure that joy drivers are installed.
$ rospack find joy
If not run:
$ sudo apt-get install ros-indigo-joystick-drivers
To run the example:
$ roslaunch baxter_examples gripper_joystick.launch joystick:=<joystick_type>
Where <joystick_type> is 'xbox', 'logitech', or 'ps3'.
(If using a ps3, make sure you run the node from the ROS ps3joy package in a separate sudo terminal. See instructions here: PairingJoystickAndBluetoothDongle ps3joy )
Note: This method uses an included ROS launch file to start both the gripper example and joy_node using the roslaunch tool. You can exit the gripper example by hitting any keyboard key, however you will have to ctrl-c to also cleanup the joy_node.
Joystick Button Mappings
NOTE: Don't forget to calibrate each gripper first.
Press any keyboard key to quit. (And no, the 'joystick left <-> robot right' mappings are not typos; they assume the user is in front of the robot when using the joystick.)
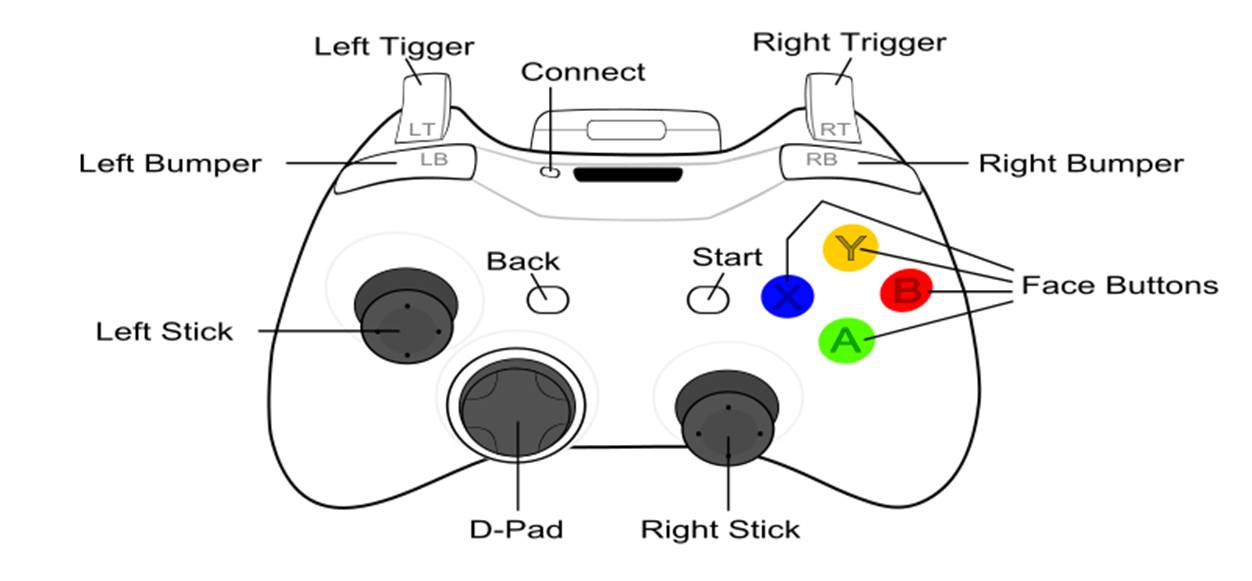
Buttons | Action | Buttons | Action --- | --- | --- | --- Function 1 or 2 (e.g. Select/Select)_ | Help | _\<Any Keyboard key\> | Quit
| | |
Top Button | right: calibrate | Right Button | left: calibrate Left Button | right: reset | Bottom Button | left: reset
| | |
Left Trigger [PRESS]_ | right: close | Right Trigger _[PRESS] | left: close Left Trigger [RELEASE]_ | right: open | Right Trigger _[RELEASE] | left: open Left Bumper | right: stop | Right Bumper | left: stop
Stick Axes | Action --- | --- Left Stick Horizontal | right: increase/decrease position Right Stick Horizontal | left: increase/decrease position Left Stick Vertical | right: increase/decrease holding force Right Stick Vertical | left: increase/decrease holding force
Directional Pad (D-Pad) | Action
--- | ---
dPadUp | right: increase velocity
dPadRight | left: increase velocity
dPadLeft | right: decrease velocity
dPadDown | left: decrease velocity
Troubleshooting
For common issues specific to using gripper_control with Baxter, check out the Troubleshooting page.