Kinect camera connectivity is supported through the SDK as of v1.1. See below for details...
Contents
Depth Sensor Setup
Installing Depth Sensor ROS drivers
$ sudo apt-get install ros-indigo-libfreenect ros-indigo-freenect-camera ros-indigo-freenect-launch
You may need to reboot the robot to correctly install the camera drivers. To start publishing the kinect camera, run the freenect_launch file:
$ roslaunch freenect_launch freenect.launch rgb_frame_id:=camera_rgb_optical_frame depth_frame_id:=camera_depth_optical_frame
$ sudo apt-get install libopenni0 libopenni-sensor-primesense0 ros-indigo-openni-camera ros-indigo-openni-launch
You may need to reboot the robot to correctly install the camera drivers. To start publishing the Xtion camera, run the openni_launch file:
$ roslaunch openni_launch openni.launch rgb_frame_id:=camera_rgb_optical_frame depth_frame_id:=camera_depth_optical_frame
Visualizing the Depth Sensor
You can now publish a static tf transform for the depth sensor connected to a frame on the robot like so:
$ rosrun tf static_transform_publisher <x> <y> <z> <qx> <qy> <qz> <qw> <parent frame> /camera_link 50
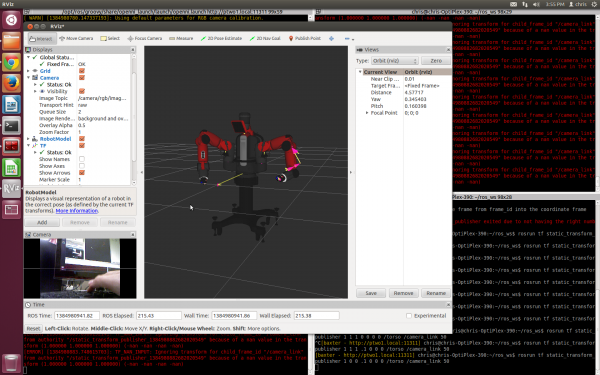
If you launch rviz and add a camera linked to /camera/rgb/image_color and add a TF obect, deselecting Show Names and Show Axes, you should be able to see the output from the kinect with an icon indicating its relative position to the robot Using the transform:
$ rosrun tf static_transform_publisher 1 0 0 .1 0 0 0 /torso /camera_link 50
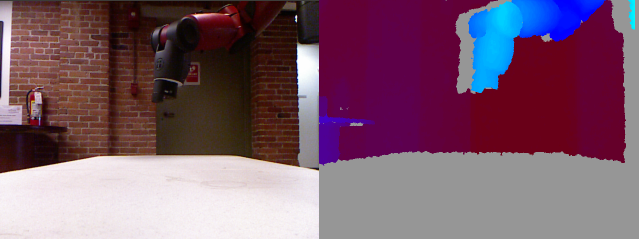
In a separate RSDK shell, you can use image_view to look at the image disparity data
$ rosrun image_view disparity_view image:=/camera/depth/disparity
You can also just look at the rgb image
$ rosrun image_view image_view image:=/camera/rgb/image_color
If this all works, then you should be good to go!
Using a Depth Sensor in MoveIt!
It's possible to integrate depth sensor data with MoveIt! This will allow MoveIt to plan paths for Baxter in dynamic environments. This functionality will required an up to date version of MoveIt!, so you should first update to the latest MoveIt configuration package. At this time, there are no drivers available to integrate either linux or ROS with the Xbox One Kinect, or the K4W2, so these instructions are for the original Xbox kinect, or the K4W and Primesense Xtion Pro.
Make sure you have installed all the MoveIt! ROS packages described in the MoveIt! Tutorial
Integrating with MoveIt!
Depth Sensor to Base Transform
You'll probably first want to specify where you've placed your depth sensor relative to Baxter. We set up a static transform publisher in our MoveIt! launch files to do this for us. By default, the camera is set to position:
 #   x     y    z  yaw pitch roll  parent_frame
 #  0.15 0.075 0.5 0.0 0.7854 0.0     /torso
If you're fine with this location for now, you can leave it as is. If not, you can supply the argument camera_link_pose with whatever transform to /torso that you desire.
  # To change the transform between /camera_link and /torso, users can override the transform between camera and robot
  $ roslaunch baxter_moveit_config demo_kinect.launch camera_link_pose:="1.0 0.0 0.0 0.0 0.0 0.0"
More information on this transform publisher can be found on ROS's wiki
Launching JTAS and MoveIt! together
After doing this, you can run MoveIt! using input from your depth sensor. You should not be running your own Freenect/OpenNI server anymore, but you should have the joint trajectory action server running in an RSDK shell. In another RSDK shell, run the kinect demo:
$ rosrun baxter_interface joint_trajectory_action_server.py
And in a separate baxter.sh Terminal:
$ roslaunch baxter_moveit_config demo_kinect.launch
Alternatively, you could run the regular MoveIt! demo and pass in a kinect argument
$ roslaunch baxter_moveit_config demo_baxter.launch kinect:=true
$ roslaunch baxter_moveit_config demo_xtion.launch
Alternatively, you could run the regular MoveIt! demo and pass in a xtion argument
$ roslaunch baxter_moveit_config demo_baxter.launch xtion:=true
After launching rviz, you should be able to see the input data from your depth sensor sensor in the environment. Self-filtering should be performed for you to ensure that the sensor doesn't consider Baxter to be part of the planning environment. You can now do motion planning for Baxter using the kinect data.
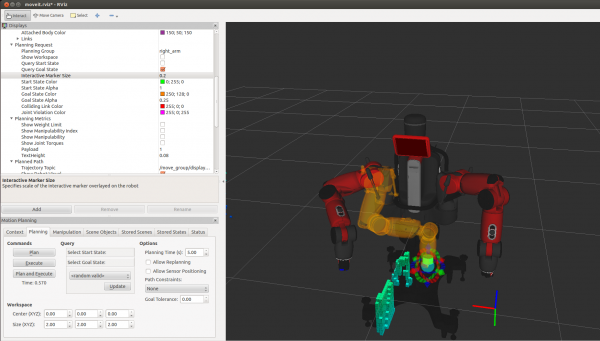
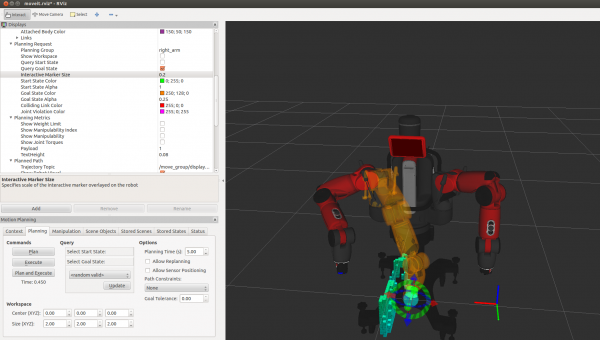
The floating set of axes in the images shows the camera location - it is not in the default location
Simulator
If you want to use the kinect data with our MoveIt! simulator, that's also possible with the same command. Just be careful to run the simulator in an RSDK shell set to 'sim': ./baxter.sh sim
Parameters
There are a couple of settings that you may want to adjust for your use case, which can be done through the kinect yaml file
$ rosed baxter_moveit_config kinect_sensor.yaml
Where you'll see the following information
 sensors:
 - sensor_plugin: occupancy_map_monitor/PointCloudOctomapUpdater
   point_cloud_topic: /camera/depth_registered/points
   max_range: 5.0
   padding_offset: 0
   padding_scale: 3.0
   frame_subsample: 1
   point_subsample: 1
Information about these settings can be found on the MoveIt! wiki
There are a couple of settings that you may want to adjust for your use case, which can be done through the kinect yaml file
$ rosed baxter_moveit_config xtion_sensor.yaml
Where you'll see the following information
 sensors:
 - sensor_plugin: occupancy_map_monitor/PointCloudOctomapUpdater
   point_cloud_topic: /camera/depth_registered/points
   max_range: 4.0
   padding_offset: 0
   padding_scale: 3.0
   frame_subsample: 1
   point_subsample: 10
Information about these settings can be found on the MoveIt! wiki