Contents
Summary
The Baxter Research Robot uses ROS to communicate with the user's Development Workstation. This requires an ethernet network to be established between Baxter and the Workstation with full bi-directional connectivity. If you have trouble connecting to your Baxter, see this page for our Recommended Network Setup and other common network debugging steps.
Basics
These Network Configuration settings are available in the Field Service Menu (FSM)
Basic Requirements
Baxter must be connected to a development workstation which uses ROS over an ethernet network to communicate bi-directionally.
Baxter's hostname can be configured using the Field Service Menu (FSM) if you do not like the one given out at the factory which matches its serial number.
Network address assignment
Baxter supports IPV4 addressing for the following network configurations:
- Automatic address assignment (“Automatic” mode)
- If a DHCP server is present in the network, the DHCP server automatically assigns a network address to the robot, and may (or may not) assign a DNS server for host name resolution.
- If no DHCP server is present, the robot will use the Autoip protocol to assign itself a link-local address in the 169.254.0.0/16 address block.
- All assignments in this mode are automatic, and no options can be configured manually.
- Manual address assignment from the Field Service Menu (“Manual” mode)
- The user must specify a valid IPV4 address for the robot, and may optionally specify a network mask, default gateway address, and DNS server address. All network options are configured manually.
Host name resolution
In all addressing modes, Baxter provides link-local advertising of the robot’s host name as “<robot name>.local” using the Avahi mDNS service. Computers that are located in the same subnet as the robot and that support mDNS can always resolve the robot’s host name as “<robot name>.local” even if no other host name resolution service is present. Baxter will also be able to communicate with these computers using their host names.
In “Automatic” addressing mode, Baxter will be able to resolve external host names only if the network’s DHCP server supplies a DNS server address. If the DHCP server does not provide a DNS server address, Baxter will only be able to communicate with external computers by their IP addresses.
In “Manual” addressing mode, Baxter will be able to resolve external host names only if the user specifies a DNS server address (and a default gateway address if computers in a different subnet are involved). If the user does not provide a DNS server address, Baxter will only be able to communicate with computers by their IP addresses. If the user does not provide a default gateway address, Baxter will only be able to communicate with computers within the same subnet.
Baxter ROS Naming Conventions
Baxter supports 3 ROS naming conventions. These control how the ROS Master publishes the access information for the individual nodes published by the robot. Regardless of how you connect to the robot, you will need to be able to reach it by the address configured by its ROS naming convention if you want to be able to interact with it. (i.e. if you can reach the robot by its IP, but it is configured with the ROS_HOSTNAME convention and you can't reach it by its hostname, then you will be unable to do meaningful work with the robot)
- ROS_HOSTNAME.local: This publishes the nodes at
<robot hostname>.local- This is the least versatile, but the most stable configuration, and is our recommended when it is available.
- This convention only works in a local setup, where your robot and development machine are on the same subnet, but will almost always work in that network configuration.
- This will only break if
- A naming conflict is introduced on the local network or
- You manually change the hostname of the robot.
- ROS_IP: This publishes the nodes at the IP4 Address associated with the robot
- This is the most versatile naming convention, but also the most fragile.
- It will work in any network configuration where you have connectivity to the robot, but will break if the IP of the robot changes
- ROS_HOSTNAME: This publishes the nodes at the hostname of the robot.
- This configuration has medium versatility and stability.
- It only works if there is a working DNS running on your network, and pointed at the robot.
- This will only break if
- A naming conflict is introduced in the network or
- If the the DNS-resolved hostname of the robot is changed, which can be done by the Server admin, but is unlikely to happen.
Network Configurations
Recommended Network Configuration
The recommended network configuration is to connect your development workstation and your Baxter to an all in one SOHO (Small Office/Home Office) router/firewall similar to the Linksys EA-Series routers. This type of router provides DHCP and other networking services, and has the benefit of keeping the network traffic off of your main network. It also allows the development workstation access to internet in particular, the Rethink Robotics github repo for code and documentation.
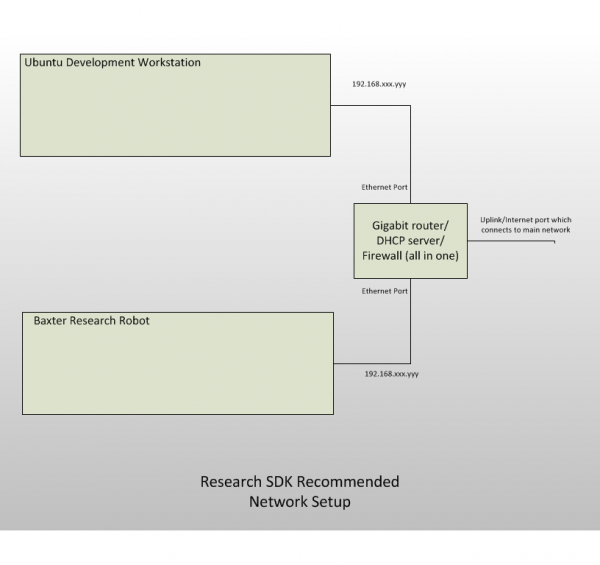
- Baxter and the user's computer can both be set to "Automatic" addressing mode, which will draw IP information directly from the router.
Baxter
- Baxter can be set to use either ROS_IP or ROS_HOSTNAME.local:
- ROS_HOSTNAME.local is our recommended ros naming protocol for the robot in this setup. It is very stable in this network configuration, and would only need to be adjusted if you switch to a separate subnet from the robot.
- If you can
ping <robot hostname>.local, then the network is working correctly
- If you can
- ROS_IP is the most reliable naming method, if you know that the robot is going to keep its .IP. This naming protocol works across all network configurations as long as you have reliable routing to the robot.
- If you can
ping <robot ip>then the network is working correctly. - Note: You can set the robot to use a Static IP if you are interested in using this naming convention because you are unsure of your future network configurations, but be sure to talk to your network administrator if you are hooking your router up to a larger network.
- If you can
- ROS_HOSTNAME.local is our recommended ros naming protocol for the robot in this setup. It is very stable in this network configuration, and would only need to be adjusted if you switch to a separate subnet from the robot.
Dev Machine
- In this network configuration, you will want to have your baxter.sh script point to either:
- ROS_IP = "<your development machine's IPV4 Address>"
- Verify 2-way connectivity by SSHing into the robot and attempting to
ping <your development machine's IPV4 Address>
- Verify 2-way connectivity by SSHing into the robot and attempting to
- ROS_HOSTNAME = "<your development machine's hostname>.local"
- Verify 2-way connectivity by SSHing into the robot and attempting to
ping <your development machine's hostname>.local
- Verify 2-way connectivity by SSHing into the robot and attempting to
- ROS_IP = "<your development machine's IPV4 Address>"
Connect Directly To Corporate Or University Network
Another viable networking configuration is to connect Baxter directly to your corporate or university network. Here you need to make sure that a DHCP server is available, and that your name server can resolve baxter's hostname to an IP address. If you plan on using DHCP reservation using Baxter's MAC address, you can get the MAC address by using TTY3.
You can set Baxter to use either "Automatic" addressing or a static IP configuration in this configuration.
Note: If you want to set a static IP, you will need to talk to your network administrator to get an appropriate IP for you to assign, in order to avoid network collisions.
Baxter
In this network configuration, you can use either ROS_IP or ROS_HOSTNAME ROS naming conventions
- In this setup, we recommend using the ROS_HOSTNAME convention. This will rely on your DNS and on not having someone else register a duplicate of your hostname (so pick a unique one), but will be very stable in this network configuration.
- If you can
ping <robot hostname>then the network is working.
- If you can
- As mentioned in the previous section, ROS_IP is the most versatile ROS naming convention that works across the most network configurations, but is susceptible to automatic IP changes when a lease is exceeded.
- If you can
ping <robot IP>then the network is working.
- If you can
Dev Machine
- In this network configuration, you will want to have your baxter.sh script point to either:
- ROS_IP = "<your development machine's IPV4 Address>"
- Verify 2-way connectivity by SSHing into the robot and attempting to
ping <your development machine's IPV4 Address>
- Verify 2-way connectivity by SSHing into the robot and attempting to
- ROS_HOSTNAME = "<your development machine's hostname>"
- Verify 2-way connectivity by SSHing into the robot and attempting to
ping <your development machine's hostname>
- Verify 2-way connectivity by SSHing into the robot and attempting to
- ROS_IP = "<your development machine's IPV4 Address>"
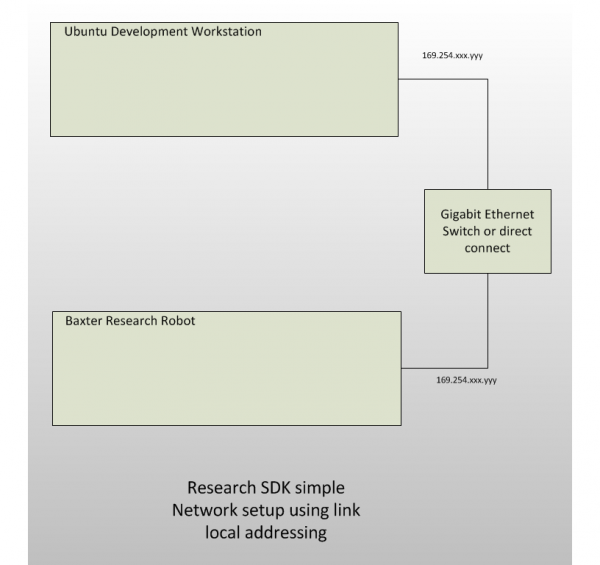
Direct Network Configuration
If you do not have a DHCP server or other networking infrastructure, or would just prefer to connect your development workstation directly to Baxter, you can do so using the following network configuration and steps.
Baxter
In this setup, you will need to set your robot to use "Automatic" addressing, and can choose between ROS_IP and ROS_HOSTNAME.local for your ROS naming convention.
- ROS_HOSTNAME.local is our recommended ros naming protocol for the robot in this setup. It is very stable in this network configuration, and would only need to be adjusted if you switch to a separate subnet from the robot.
- If you can
ping <robot hostname>.local, then the network is working correctly
- If you can
- ROS_IP is the most reliable naming method, if you know that the robot is going to keep its .IP. This naming protocol works across all network configurations as long as you have reliable routing to the robot.
- If you can
ping <robot ip>then the network is working correctly. - Note: You can set the robot to use a Static IP if you are interested in using this naming convention because you are unsure of your future network configurations, but be sure to talk to your network administrator if you are hooking your router up to a larger network.
- If you can
Dev Machine
- In this network configuration, you will want to have your baxter.sh script point to either:
- ROS_IP = "<your development machine's IPV4 Address>"
- Verify 2-way connectivity by SSHing into the robot and attempting to
ping <your development machine's IPV4 Address>
- Verify 2-way connectivity by SSHing into the robot and attempting to
- ROS_HOSTNAME = "<your development machine's hostname>.local"
- Verify 2-way connectivity by SSHing into the robot and attempting to
ping <your development machine's hostname>.local
- Verify 2-way connectivity by SSHing into the robot and attempting to
- ROS_IP = "<your development machine's IPV4 Address>"
Avahi Configuration Steps:
These steps assume your ethernet connection to the robot is on eth0.
- Shutdown Baxter and disconnect ethernet cable.
- Connect the laptop/workstation to Baxter using a Category-5 ethernet cable.
- Power up Baxter.
- Disable firewall on laptop if necessary:
$ sudo ufw disable
- Turn off the Ubuntu Network-Manager to prevent interference:
- Go to the Networking Icon drop-down menu in the top-right of the Desktop.
- Make sure 'Enable Networking' is unchecked (if checked, select the option in the menu to disable)
- Check status of eth0:
$ ifconfig eth0
You should not see any IP addresses under 'inet'.
- Use Avahi to designate an IP address to eth0 (do not close the terminal after running avahi-autoipd):
$ sudo avahi-autoipd eth0
- Make sure an IP address is successfully claimed. eg:
    Found user 'avahi-autoipd' (UID 104) and group 'avahi-autoipd' (GID 111).
    Successfully called chroot().
    Successfully dropped root privileges.
    Starting with address 169.254.8.16
    Callout BIND, address 169.254.8.16 on interface eth0
    Successfully claimed IP address 169.254.8.16
Keep this Terminal running in the background.
- Open a New Terminal to continue.
- Find the local hostname of the robot by running avahi-browse:
$ avahi-browse -a -r
The default local hostname of the robot is the Serial Number followed by local. Ex: '011303P0017.local'.
Troubleshooting
See the ROS Network Setup Guide for common ROS network issues and helpful debugging steps to check your base ROS connectivity.